


I'm very weirdly old-fashioned when it comes to mail. Like...snail mail, not email. Do you Gen-Zers even know what snail mail is? I prolly shouldn't add fuel to this weird generational feud we're apparently in, so I digress. ANYWAYS. I love sending beautiful pieces of mail...cute little cards, envelopes with gold lining, wax seals, brush lettered addressees...I love all of it.

So what exactly is the problem? Well. As my dad likes to tell me, the nuns at my Catholic school would be rapping my knuckles if they saw my handwriting today. In my defense, I'm a software engineer. I type all day long; I don't write anymore. So imagine my horror when I have this beautiful piece of stationery...until you get down to the chicken scratch address. Woof. Sidenote: do y'all think dogs are offended that we use "woof" as a term of ugliness...?
Most people, if plagued by this super serious problem, would probably just work on their handwriting. Not me! I'm lazy. And I have this super fancy machine sitting in my office that can write FOR me, so I've started using my Cricut to address envelopes! As with most Cricut projects, there's a bit of a learning curve, but once you get the hang of it - easy peasy!

1) In Cricut design space, Shapes > insert a Square.
2) Change the square's color to white.
3) Click the Lock button to unlock your dimensions.
4) Measure your envelope - these instructions will be geared towards an envelope that is 7" wide and 5" tall but adjust as necessary for your own envelope. Enter your envelope's width and height into the Size fields on the toolbar. You'll be left with a square the size of your envelope.

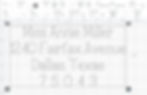
5) Click the Text function, enter "Please Deliver To:", and set your text box settings as follows:
Font: Soiree Lettering - Grace Script
Style: Writing
Operation: Pen
Color: Calligraphy (2mm), Gold
6) Click the Text function for a new text box, enter your addressee's name and address, and set your text box settings as follows:
Font: Elfie
Style: Writing
Operation: Pen
Color: Fine Point (0.4mm), Black
Alignment: Center

7) Drag your text boxes onto your envelope square and size accordingly. Please Deliver To should be a little more than halfway down the envelope with the addressee below it. I like to make Please Deliver To: slightly bigger than the addressee.
8) Once you're happy with the sizing and spacing, select all elements > Align > Center Horizontally.

9) With all three elements still selected, drag the group over to the 0"x0" coordinates in your workspace, as close to the top left-hand corner as possible.
10) Deselect all three elements and select your text boxes > Attach.
11) Note where your text boxes fall on the ruler. On my envelope, the D in Deliver is lined up with 3" on the x-axis, and the M in Miss lines up with 3" on the y-axis. Find your own landmarks though - take a screenshot if necessary!
12) Locate your Square element and hide it; the eye icon should have a slash through it.
13) Click Make It!

14) Design Space will move your text up to the top corner, so this is where step 11 comes in handy. Grab your text boxes and drag them such that your landmarks are lined up with their coordinates. Hit Continue.

15) Stick your envelope to your Cricut Standard Grip mat, lining the corner up with the 0"x0" coordinates. Use painter's tape to tape the top edge of envelope to the mat - envelopes have been known to slide around.
16) Choose light cardstock as your base material.
17) From here on, just follow the on screen instructions!

So like I said, a little bit of a learning curve here, and if you're totally neurotic like me, you can always do a test run with a sheet of paper and make sure the writing lines up with where you want it on your envelope. Once you get the hang of it, the world is your oyster - play around with different fonts and markers and spacing or even print your return address on there too. It's kind of addicting - feel free to blame me for any blossoming stationery obsessions!
shop the post: